Wednesday, May 04, 2011

Minnie Mouse Birthday outfit

Let me start by saying...this is probably my first sewing project EVER out side of  hems and such.
Well, my Daughters 2nd birthday is quickly approaching and we have decided since she loves Mickey and Minnie Mouse that we are going to have a Minnie Mouse party.   (mainly due to Mommy wanting to keep the party girly...otherwise we probably would have gone with a "Wiggles" party...shame on me, I know...but she has years of choosing her own party themes...so I took advantage of being able to choose it myself!)
ANYHOW, I had been looking at so many DIY blogs...and several who had kids had been making shirts and doing over skirts and pants with all sorts of different things.  (Any of you who follow the decor and clothing blogs know what I am talking about)   SO I got this bright idea, instead of BUYING her a Minnie mouse outfit (that was practical to wear daily)   I would make it myself, and I have always LOVED DIY projects.   SO after HUNTING high and low for a SHORT-SLEEVED black T-shirt...I gave up and went with a White T-shirt.  Had previously bought some Solid pink fabric, pink polka-dot fabric and polka-dot ribbon and set down to due this sewing project. 
I found a Mickey Mouse head on line and printed it out on card stock the size I wanted and then pinned it to the solid pink fabric and cut around it.  Then ironed on some "wonder-under"  (a iron on adhesive) to the underside of the fabric.  Then placed it on the shirt and ironed away.   (I had to off-center it due to the little pocket on the front, and so it wouldn't be to low on the shirt and risk the bottom part of the mouse being tucked into her skirt band.)  

 Then I took some Black floss and stitched around the edges.  * on my next project I will sew around edges then use the floss....so when washed it won't fray as bad...but I need to have a steadier hand before I do that*
I used the polka-dot ribbon and made a quick bow...following the tips I found on a couple YouTube videos.  then attached the bow using a safety pen on the underside.  (so I can remove when washing)
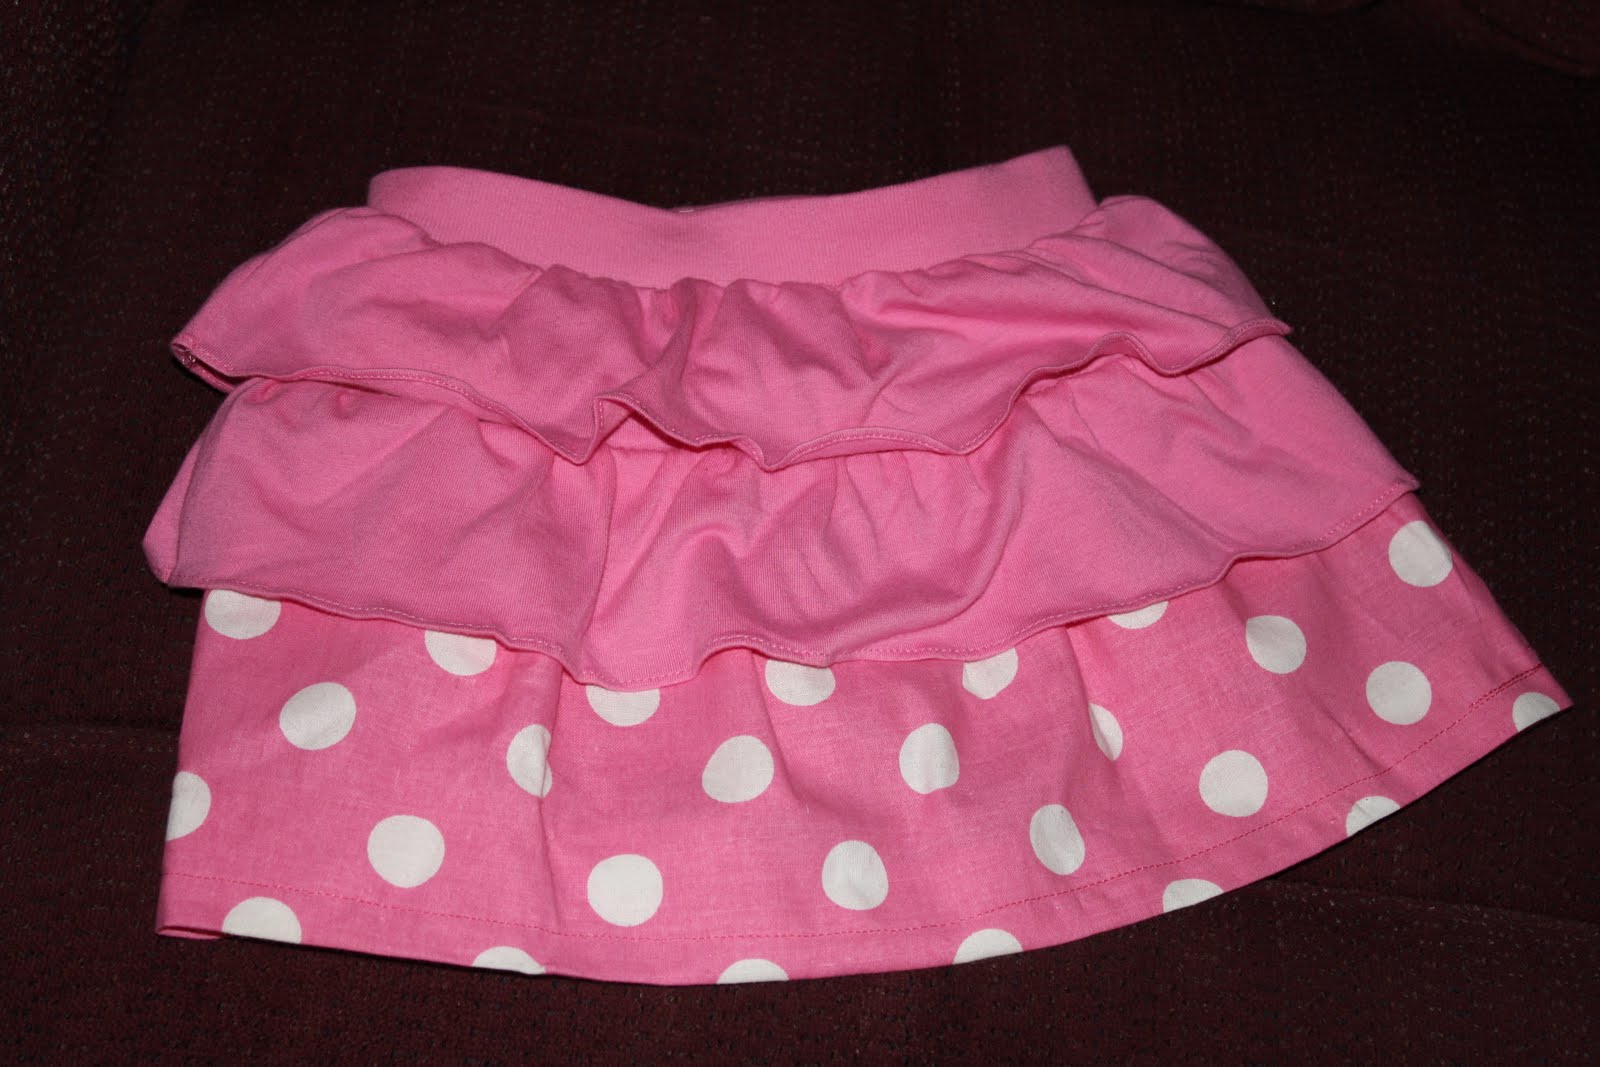
 NOW the skirt, was MY hard part.   I remind you , I have never sewn anything outside of Hems and slits in my skirts for college.  The skirt I purchased at Wal-mart for like $3...it had 3 solid pink tiers.   I cut off the 3rd one just slightly below the place where it was attached to the skirt.  Then took my polka-dot fabric and began pinning on the underside...allowing a little material to gap between each pin.  I actually needed a little longer piece, due to the fact the ruffles are not as big as I wanted but as I said...this was my first time.  Then I made the side seam. *which I was pretty proud of...matched up pretty well....but the dots served as a great line to go by so that helped!*   Got out my sewing machine (given to me by my husbands grandma) and just sewed  straight along the line I pinned.  I took out one of her skirts that I liked the length and began penning up the hem line.   Then pressed it really well with my iron.  (a tip a lady in line at JO-Ann's told me....the best advice she was given and would give to others who are beginning is PRESS everything before you sew it....wether or not its GOOD advice or not...for this project it REALLY helped me)  Again the dot's helped me keep it fairly straight.   I thought for sure my hem would be all crooked and short in the back.  
I was so excited to do this project ALL BY MYSELF  ( yes, I am pretty independent!!!)  My husband asked me if I was going to cry!  LOL  I didn't but I was pretty happy!   And it looks so cute on her...and we have Minnie ears with a pink bow...and I am making her a pink bow out of the same ribbon that's on the shirt...due to the fact the ears will probably stay on all of 5 min!

HAPPY CRAFTING!!!

Sunday, February 13, 2011

Canister Makeover

So another Apple makeover project....I was pretty excited about this one.
When I first got married I was SO EXCITED about these canisters.  They were from "Home and Garden" another company like "Home Interior"  I loved them...and they were a bit expensive but between my husband and his parents they got them for me, the Christmas after we were engaged or as a shower gift?  I Can't remember.
ANYHOW, I didn't just want to pile them in a garage sale and get NOTHING for them...plus I needed them for decor.  I use one for sugar, but it stays in my cabinet. So, I started hashing out in my brain projects I had seen on different blogs and what I could do to make them over and use them in my decorating.
First off they were a glazed pottery so I knew just taking regular paint or my "go-to spray paint" would not stick.  So I found out I needed to prime them first.

 Primed and ready for paint
 So I found 2 colors that went great with my decor!  I was THRILLED!!!!
Bauhaus Gold and Burgundy.
It's not the greatest spray paint job. But it's ok for me...adds texture!
For the star I took a stencil and a sponge brush. 
Then sprayed some paint on to a Styrofoam plate. (wrong move! it ate the plate up! LOL!!! Some of the sticky, stringy plate is on the star..but again it added texture and you can't tell...just looks like I have meant for it to look that way! So a mistake turned out to be a good thing and gave me the look I was going for anyhow.)  I am going to try and work on the spot that I smudged above the star.  Not sure if it an be fixed or not

Then I took some black paint and a sponge brush and sponge painted the rim of each pot. I like how it turned out.  I didn't show the yellow pot..but they all turned out great.  Once everything is done I will try to get better pics of it all.
But for now I am loving my new pots!!!

 I have to include a picture of my little girl...who is quickly growing up.
This is her first dress that she has a doll dress to match.  She got it for Christmas..but it's almost to small..not sure if she will get to wear it again.  So I HAD to get a picture of her and her dolly matching.
 Yes, I am one of those crazy mom's that husbands put up with when we try to make sure our family matches or at least coordinates when going to church.  SO GLAD my husband goes along with my madness..in fact sometimes he even asks what color Katelynn and I are wearing so he can match us!  (GOTTA LOVE THAT GUY!!!)
 A cheerful little girl and her daddy. 
Love the curlers!!!

Monday, February 07, 2011

Katelynn Review

 Katelynn Nicole Thompson
20 months
31 lbs (approx)
32 1/4 in (approx)
In the 90% for height and weight
Size 2T-3T roughly  (some 24 month stuff will fit her.)
Food: Loves peas, carrots, grapes, apples, fruit snacks, pretzels, Ice cream, and cheese, candy
Dislikes: I wouldn't say she Dislikes meat...but she would prefer veggies and fruit over her meat
Fav toys: Bubbles (her stuffed monkey), her tea pot, Noah ark set, grocery cart, camera, her watch, most of her stuffed animals and baby dolls.

Fav games:  Rolling ball, doing puzzles
Fav songs and Movies: "Fingers" song from "The Wiggles", "I love you to the moon"  sung and wrote by Mommy. :)
Loves helping out with Laundry and dishes.
Has Great manners...says Please and Thank You alot!!!  We are so proud of her!
Can point out almost every body part...including her collar bone, chin, arm, neck, back, and wrist
Can do several simple puzzles all on her own.
EEEEE  UU!!  Aka- Love you!

Funny words- 
 Eye= yes
doe toe= Pluto (Disney's dog)
Doofy= Goofy
Wee wee- Wiggles movie
Pez zels = Pretzels
Bay kit= Blanket
Ni Ni= Night night

She gives hugs so much now...and bunches of kisses!!
More of a Mommy's girl right now..but sometimes when she is hurt she does want daddy to kiss it!

Friday, January 28, 2011

A budding artist


This year for Christmas, Jonathan really surprised me with a gift from Katelynn.
I LOVE crafting and making things and I love having someone to do them with now too.
He bought a mug that you can paint and draw on and then bake it.
I was pretty excited to do it...but wanted to wait...so I put it in a drawer and when I was packing things for vacation I found it..I was pretty excited to be able to do it.
Katelynn was pretty happy about it too.

 Mommy drew some pictures on it first then I gave her the paint an the brush and let her go to town.
As you can see I painted a little bit first to show her how it needed to be done.
 Concentrating hard on getting paint on her brush.
 Pretty excited to paint mommy's gift

 Getting quite colorful
 Learned to hold the brush pretty well for a 1 1/2  year old
 Finished product...Mommy was quite happy.

 Messy artist hands

 Enjoying a tasty Zebra cake as a treat after lunch
 Good till the last bite

 Having a little girl has been the BEST thing that has ever happened to me.  I have loved every minute of it!!!  When I was a working mom...I had so many dreams and wishes that I wanted to do..but just not enough hours in my days to do it all.  I became so overwhelmed and really started to HATE who I was becoming as a mom.  I was an anxious ball of nerves and would burst at every upset.  I had began praying long before Katelynn was born that MAYBE...just Maybe I could become a stay at home mom.  It was with a hopeful heart I listened to Jonathan as he told me I would probably be able to quit work in Oct 2010.  Even up to the month of Oct...I was so excited but part of me KNEW something bad was going to happen and I would not be able to quit.  Well the time came...and I was able to quit.  And somehow something in me began to relax.  I don't like to think of myself as a controlling person...BUT when it comes to my own life and family...I want to at least feel I can somewhat "Control" what is happening .  And with working...I felt TOTALLY lost.  My HEART GOES OUT..to mommy's who WISH beyond anything that they could  stay home.  I know that feeling!!!!   I pray for different mom's that I know that wish they could have the stay at home life.
God has been so good to us...in supplying our wants and our desires...and I am looking even more forward to the fact...that by the end of Summer 2011 with the exception of our house...we will be DEBT FREE!!!  God has helped us and is still helping us!


Wednesday, January 19, 2011

1st Modge Podge craft

Got my floral foam FINALLY!!!  Those crazy things are more expensive than what I thought they would be. But thanks to 50% off at JO-Ann's I was able to get this for a little over $3


My 2nd floral arrangement I have done.  I am beginning to like doing this!  Still have a long way to go...to being good at it...but I do enjoy it.


And here it is...I think the colors are a bit bright..so I mght have to add a few things to the center arrangement so that it flows well.  Not really sure.  I will keep staring at it...and maybe it will hit me...what I need to do.

Another arrangement that needed a MAKEOVER!
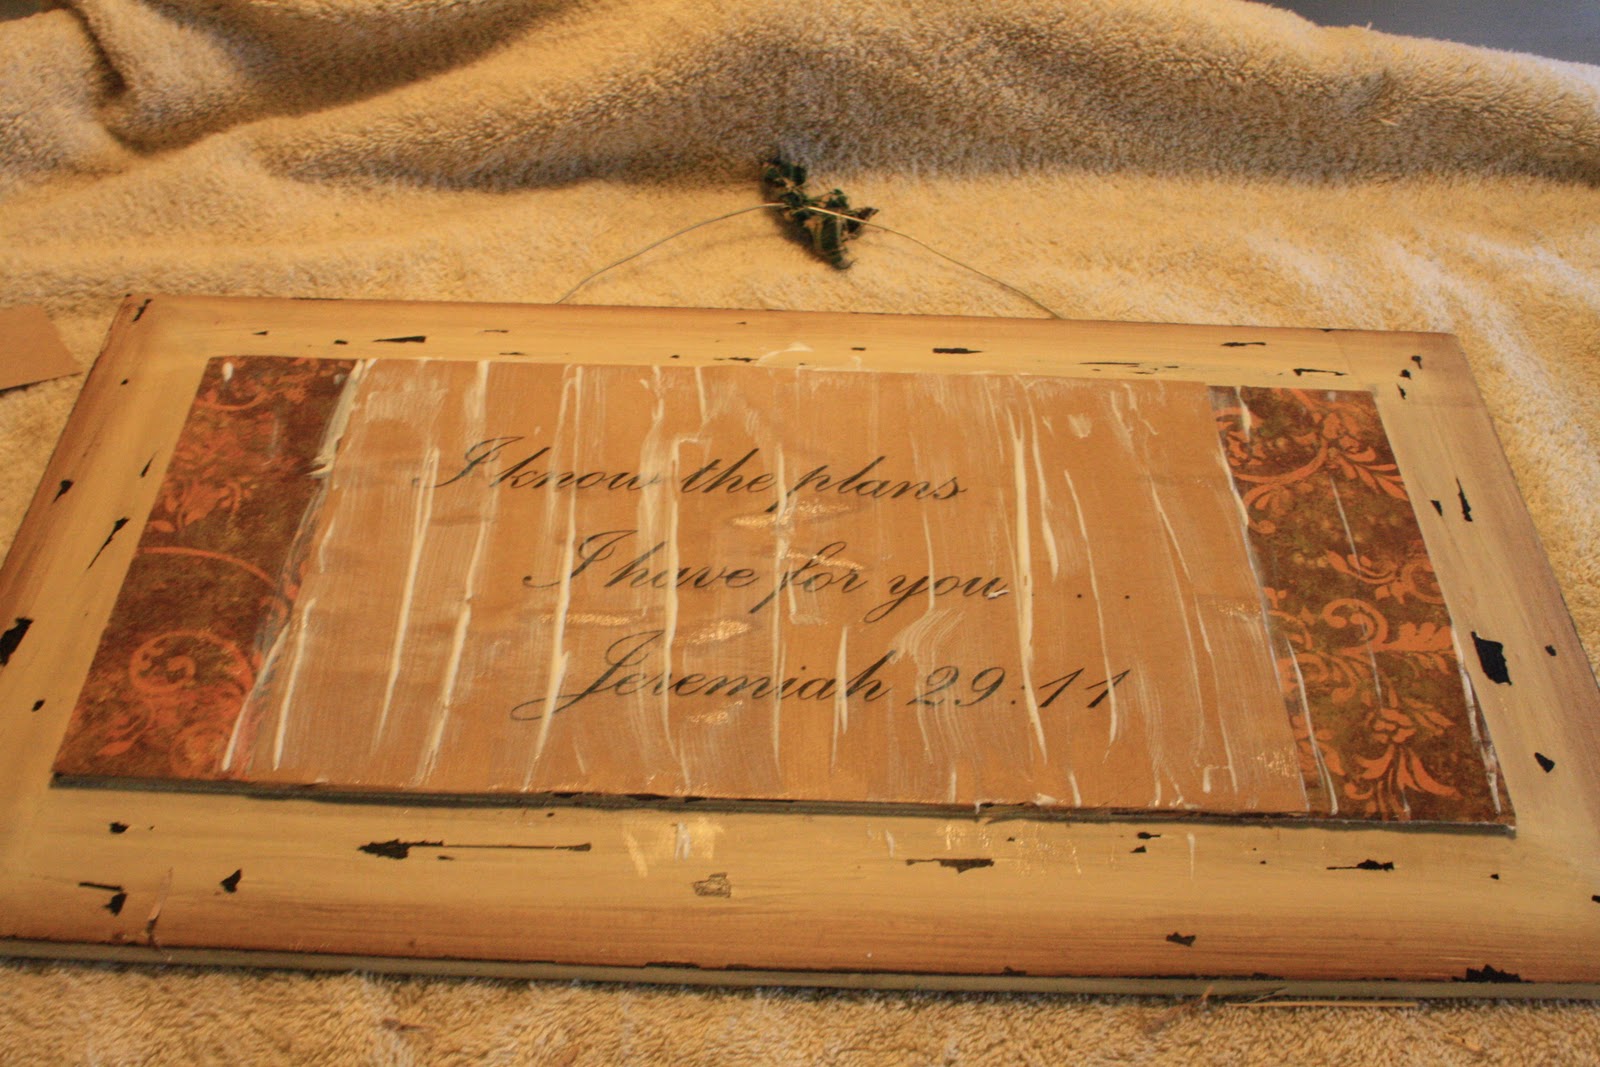
Since I am getting rid of the Apples in my kitchen.  This sign needed to go...BUT I kind of liked it..at least the fact that it was a sign and it was destressed looking.  And a new sign this size would cost roughly $10. I could do that...but I have been seeing SO MANY makeover projects I decided to try one out myself.


After going through alot of scrapbook paper, I finally decided on a design that I felt would look nice in my kitchen. Got out my new bottle of Modge Podge (that I had on hand for another project...still waiting to be done..waiting on some stencils)  I have to say I was pretty excited to do this!

1. I placed the scrap paper on the sign and creased it on the edges where it hung over....then took a box cutter and sliced off the excess. 
2. then took my sponge brush and layered on the Modge Podge. Placed paper on top. Then smeared more modge podge on.

3. Then quckly before it dried I placed my center piece of SOLID scrap paper (that I had previously printed with a scripture and then measured and cut to fit) on top and smeared more Modge Podge on with my trusty sponge brush.
4. I repeated smearing more Modge Podge on every 15 min . About 4 times.
I learned not to do it to thick...and not to let it pool up making several white lines...that I had to peel off carefully with a knife.
5. After it was all dry...about 30 min after the last layer was put on...I took a coarse nail file and rubbed it over the top and the side....so it gave it a rugged look. 
6. Lastly took a lightly damp cloth and wiped it over the entire sign...then a dry one to dry it all.


And after about 3 hrs...here it is!
The one thing I don't like is when My kitchen light is on and if your standing directly accross from the sign..you can not read it due to the glare off the Modge Podge.
 Other than a few bubbles in it...I think it turned out ok..for my 1st Modge Podge project.


Thursday, January 13, 2011

All in a winters day

SPACE SAVER BAGS
I have HUGE like for them.  I say LIKE and not LOVE due to there are some issues with them.
In this SMALL bag  there are: (Katelynn's clothes)
2   socks
13 skirts
4 dresses
1 Halloween costume


FROM this Extra- Large bag:
1 twin size thermal blanket
2 large throws
4 baby blankets.

 TO THIS:
 Issues with the bag is it doesn't always keep it's seal well.  But if you get it into the area you want it and don't yank the bag around to much, and make sure your really get the zip lock bag locked well!
But It has saved me a ton of room with having a growing toddler with lots of clothes.

AROUND OUR HOME LATELY

Anyone who has kids has made at least 1 homemade tent at some point.
Here was Katelynn's first real homemade tent!
I don't think she quite knew what to think when I started bringing all the kitchen chairs and her Highchair in the living room.
She had a blast.  Mind her outfit, we have been going thru clothes and just like a kid when you go through OLD toys they suddenly become their favorite again...well my daughter does that with her clothes.  She thinks she has to put them on.  SO the last few days we have worn OLD PJ shirts over our outfits.  I figured the layers are not going to hurt her and as funny as she looks, it keeps her happy.  And WHO CARES, we are at home..she should be happy and comfortable. 
 Mommy and Katelynn enjoying the tent
 Braving the cold..and enjoying the snow.

 Has to be one of MY FAVORITE OUTSIDE pictures of her!!!   TOTAL JOY!!!
 I think she had more fun rolling in the snow than anything!  Probably due to the fact she had several layers and couldn't move really well!  Mommy wanted to be sure she was warm! :)
 Yes, she ate lots of snow...and NO it was not YELLOW either!  I didn't think about it until I was shoveling the drive way and saw some and quickly got rid of it and had her stay away from that pile! 
SO winter has been enjoyed! 
BRING ON THE SPRING!!!!

Monday, January 10, 2011

A new look


I have had Apples in my kitchen since I got married.  And before that my mom had apples in her kitchen.  Needless to say I am tired of looking at apples!
SO, after I took my Christmas decor down I put up some of my new decor.
It's far from being done....but it is a start...and I am really loving it!

I love the big floral arrangement...in the wooden water can...but I think I am going to use it in my living room on top of my entertainment center. I may add a large frame with what has become popular "Subway Art"...still thinking on that one.  And the family photo frame...I am going to add some colored scrapbook paper behind the letters.  The canisters to the right have apples on the back.  They were a pretty expensive set..and I need them for decor...so I plan to prime them and then paint them either burgundy, or golden yellow, or light olive green and then add either some words like "faith, Hope or family" or a "Star" or something.

 This is on top of my fridge....I am pretty pleased with it as is!
The picture says... Life is not measured in how many breaths we take..but the moments that take our breath away.  (or something like that...to lazy to go look right now!)
 LOVE this side of my kitchen.  (which tells me I still need to really work on the other side to match the thrill I have at looking at this side!)    I found the little Planter tricycle at A.J Wright (same line of store as a T.J Max)  Still need to take the tag off, but I am waiting on a coupon from Jo Ann's or another craft store to buy a floral dome, so I can put some silk mums in the basket.  The basket of Ivy on the Far left is going "bye-bye" and I will be still looking for something else to place there.
 Here is a close up of the middle...that I am just "IN LOVE" with.  I got the bucket and the Burgundy jar and the wooden star with candle (which does light up) from the coverbridge festival. The bucket and jar I got at the same booth..the star I got a year ago.  The Ivy in the bucket I got from $ Tree.  Then the "Family" Jug...I got from Flower Factory.  The wooden star is sitting on a upside down basket that holds one of my round baking dishes.
Like I said, I still have a ways to go...but for now I am Loving the new look!  I have alot of work to do transforming some signs that I have in my kitchen that say things about Apples...but with a little paint and some Modge Podge  I think I can save money and REMAKE them to what I want.  Pretty excited to think of the possibilities!

Tuesday, December 28, 2010

What I've been reading! (OVER and OVER.....)


Jonathan and I started a tradition for Katelynn.  Last year and this we have bought her a Christmas book.  I found this one on Borders website and it was only $6.99.  I also had a $5 off coupon off ANY   in-store purchase.  SO...I headed off to Borders bookstore a few weeks before Christmas and picked this book up.  It was PERFECT for her age.  Short and Sweet.  Have I mentioned she LOVES books.  Little did I know that this book would quickly become her FAVORITE book.  I think I read it on average about 6 times a day!  Plus, she sleeps with the book!!!
The book is really cute...talking about a mouse telling everyone in the stable that SOMEONE is coming to this house.  And the animals (in response to the mouse) began cleaning up the barn for Mary and Joseph.  I would be embarassed to read it for you due to the fact I try my best to change my voice for each animal.  My husband gets into it some too...but not as much as me.  He gives me the "you're crazy" look as he sits across the room while I read it to Katelynn.

I am so happy she loves to look/read books and loves books being read to her.  But this book, I must confess, get's hidden at times so I don't have to read it for the 10th time that day!!!
But I am happy I picked a winner this year!

Thursday, December 16, 2010

Mary did you know? I wonder?

I have began to ponder  (ok so that word is to big for me) think about the Christmas story this year.  Is it just me or do most mothers tend to gravitate towards Mary the mother of Jesus...and what she must have been thinking.  With 3 Christmas' now being in some stage of motherhood...I seem to have been thinking about Mary alot.  I listened to "Mary Did You Know"  So that just made me think about it more. 

I have to wonder, Did Mary Really know?  I mean all of it?  His whole life?  I mean I know the Angel told her that "He shall save His people from their sin." (Matt 1:21)  And "Mary kept all these things and pondered them in her heart." (Luke 2:19)  But that does mean she thought it over right??  I mean, she didn't really have a choice in the matter...but If had been highly favored in Gods site...enough to bear His SON...I don't think I would want to change my situation either.  Although, if I thought to much...I would probably freak out and think...there is NO WAY I can do this.  I mean...RAISE GOD"S SON???  And if she knew everything?  And just HOW he was going to "save His people from their sins".  If I knew all that I think it would break my heart.    I look at my daughter and if I knew all that her life was going to hold...and couldn't change any of it.  How would I re-act?  How would I feel?  Would I have a broken heart?  Would I be happier beyond words?  Would I have a bitter-sweet moment?  COULD I HANDEL IT???

 I am just glad that God really knew what woman to pick.  I can't imagine how she felt knowing that "Goldfish" feeling in her tummy was the Son of GOD! And then riding on a DONKEY, in the last part of her pregnancy???  I had a hard time sitting in a church pew without my back killing me...let alone a DONKEY!!!  I won't even go into the accommodations she had for delivery...BOY are we girls spoiled and think WE have it rough!!!  Finally, that squirming bundle of joy, she had to wrap in swaddling clothes.  Did she bring them herself?  Or did she find them in the stable?  Did she go into early labor...or had she planned a home delivery once they got back from Bethlehem? And she had to lay him in the Cow's feeding dish.  Did she make Joseph change out the hay to fresh hay ?  Or was she to exhausted and excited taking in her newborn son to worry about that?  Did she count his fingers and toes?  And at what point did it hit her that she was looking into the eyes of the Son of God and kissing his tender face?

A baby always seems to bring out the best in people...what kind of emotion did it bring out in Mary and Joseph?  And every new mother has guest...but dirty smelly shepherds?  I mean, today we pass around the sanitizer before anyone touches or holds our new babies.  And if you have the sniffles...a new mommy gets quite antsy for you to hold her new precious child.  But these guys probably had grubby hands...and most likely didn't smell good.  Or did they try to clean up?  The angel did tell them they were going to go see JESUS...so did they think about their appearance?  And Mary, no doubt exhausted, welcomed in her guests smelliness, grubbiness and all!  What a woman!

Then instead of being able to go home..they got a new home and moved in.  And after some settling in they heard some commotion going on out front of their house.  Three men, with very expensive clothes were approaching. Mary and Joseph had began to notice that bright star that bathed their house every night, was very bright!  (ok, so maybe that part is not totally scriptural...but I think after some time I would notice a big star that didn't seem to move from being over my house!)  I wonder did Mary and Joseph's neighbors notice all that was going on???  How did Mary feel about these 3 important guest?  Did she have any sort of feeling of embarrassment about the quaintness of their house.  Or where the kings gracious and make her feel so comfortable? The presentation of their gifts had to be amazing!  I wonder what she did with them? And after all that did she invite them in for food and fellowship?  I have no doubt Mary was a gracious hostess.  After all God knew about all this, and knew all the phases she would have to go through.

Then the dedication, Simeon and Anna...I can only imagine the pride that went through those new parents hearts.  The same pride that any parent has when someone makes over their new child!

All those years in between the events surrounding his birth and when he was 12 and they found him in the temple are not talked about.  I can only imagine the memories Mary and Joseph  made.  How did they feel when he cut his first tooth?  Was Jesus bald or did he have LOTS of hair as baby?  What did they do on his birthday?  Just how excited was Mary when Jesus took his first wobbly step?  Can you imagine having such an OBEDIENT child?  What was his first word?  Did he say Ma Ma or Da da first.  Was he a Daddy's boy or a Mommy's boy?  (I think he was a Mommy's boy)  What was his favorite toy?  What was school like for Jesus?  What was Jesus favorite food?  Did He like sweets?   Just how was his childhood?  You mothers who are more experienced then me...could continue this list.  I know we are talking about Jesus...and I don't want to Humanize nor diminish just WHO HE IS...But He did have a childhood...and He did have a normal mother who went thru all the normal emotions that any of we Mommy's would go through.  I just wonder???

This Christmas, let yourself wonder.  You might be amazed how the story hits home in your heart...it has mine!!!!

Friday, December 03, 2010

Project Topiary....DONE!

Another project DONE!!  YEA for Me! (mind me as I do a little happy dance!)

I was visiting alot of blogs sometime in October and found this project.  I did not get the website, but I do believe it was one of CREATIVE BLOGS in my side bar.  Sorry I can not take credit for all of it. BUT, I did add my own take. 

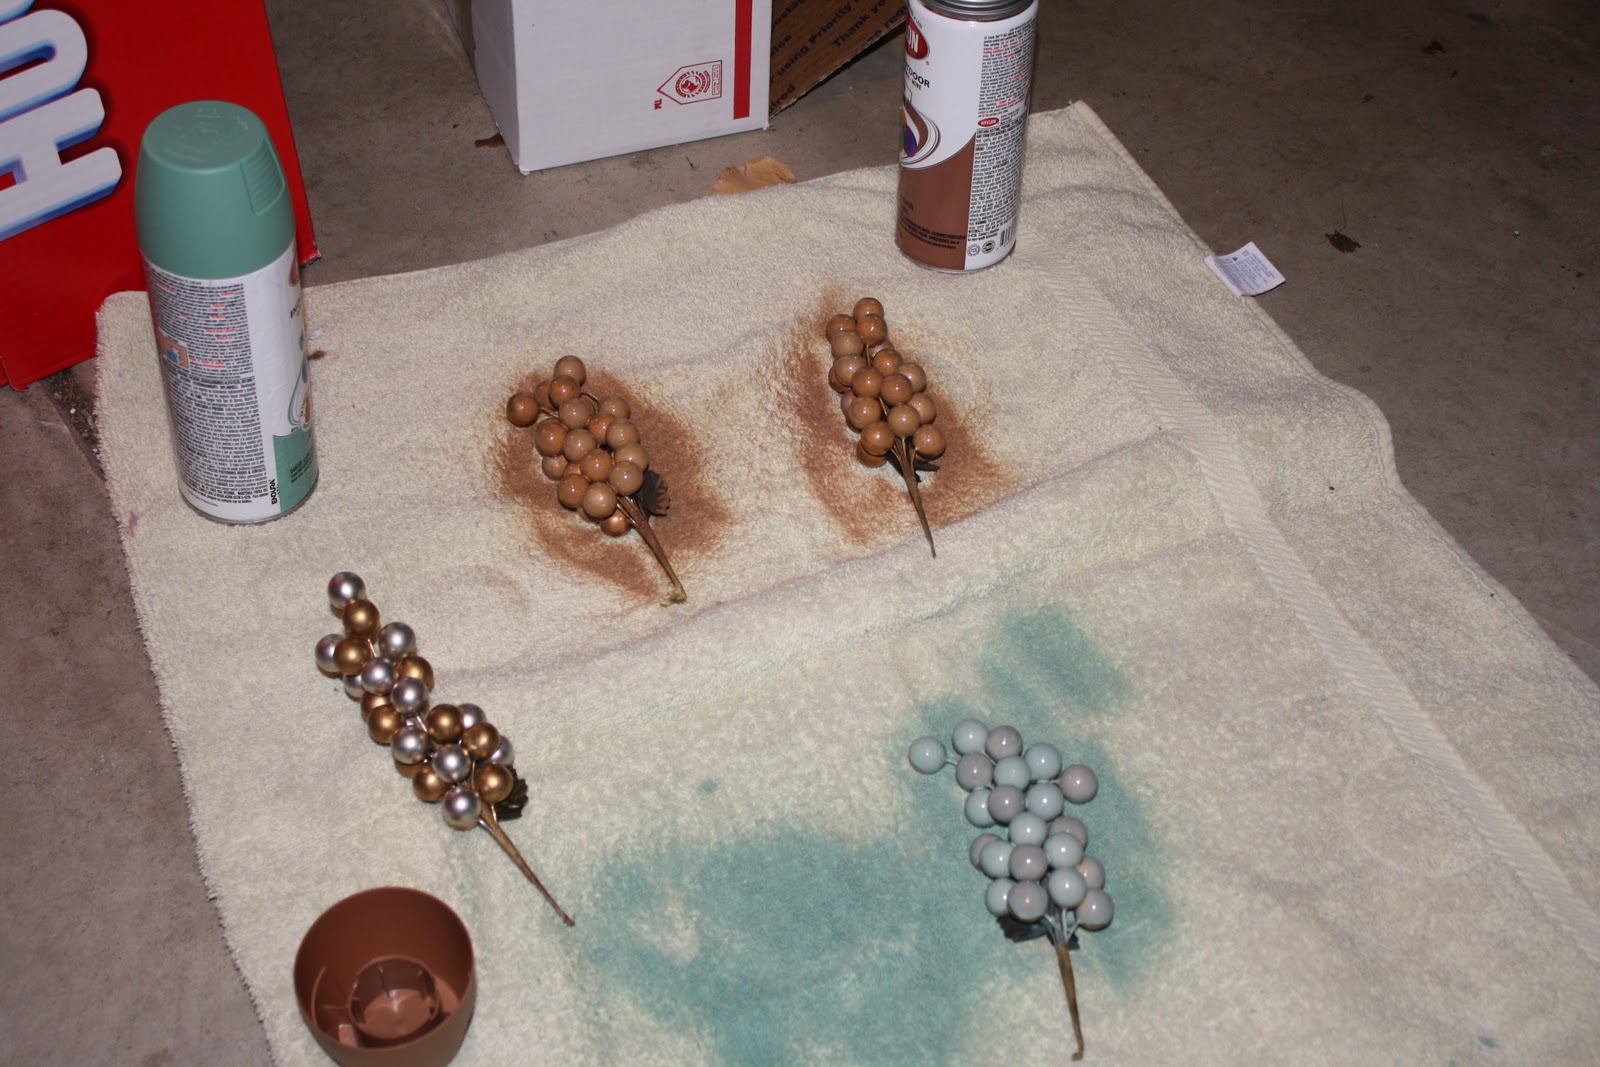
I could not find the Berry Picks in the color I needed, but as you soon find in crafting SPRAY PAINT goes a LONG way and you find yourself coming back to it OVER and OVER again.  (Right Leah???) 
Any how, I just happened to have the colors I needed at home that I had purchased to go with 2 other projects. (still wating to be done.  In my defense one is a future Jr. Church decor project.) 

Anyhow, so out I went to my COLD garage with my Gold Berry picks, and began spray painting away with these colors:  Sage and Brown Boots

They spray painted quite well, and to let them dry I poked the stems into a box and had them dry upright.
*on a side note:  this blonde did not crack the door on the garage, thus got told by my loving Hubby if I didn't want to risk getting high off the fumes I had better at least crack the garage door to get some air flow.*  What do I know??? 
If your doing this your self you might want to spread apart the stems and THEN spray paint them.  They tended to stick and got these little notches on them...but it didn't look to bad.  (and I didn't want to spray paint them again.  Some of them had to have a second coat, just to cover the original color well.)


I also took a medium Styrofoam ball and spray painted it brown.


After every thing was dry I brought it all inside and began to assemble.
Things you need: (will list again at bottom of blog)
2 Styrofoam balls (1 painted 1 not painted)
*I spray painted the one the berries went into, just so the WHITE would not be seen*
a vase/pot
a long stick
(can use a dowel rod..but will need to paint it..I got a stick from my tree outside.  Just make sure the stick and the Styrofoam ball you use compliment one another)
SEVERAL berry picks (I used 3 colors and 2 sizes ) I used about 10 berry picks
Hot Glue gun
Wire cutter
Flowers (if desired)
 Began cutting the berry's off .....leave enough wire attached so you can poke it into the ball.

Began assembling. I placed my stick into the bottom first so I would know the top from the bottom.
  I really kept NO pattern with the berries...liked the abstract look.
I also added some flowers into the mix...and I chose to use the flower buds that looked like they were just starting to open at the top then used the open blooms at the bottom of the ball.  I just popped the flowers off the stem and HOT GLUED them into the spots.  On the open blooms I put a few berries underneath the petals so they would pop out.
 Once I was done. (that step took awhile...and keep the glue gun handy some of the berries like to fall out...but I tried to use it the least as I could.)   Place the 2nd ball into your vase/pot and poke the stick into it. Make sure it is pushed down far enough to support your Topiary.  (I had to purchase another base...due to the square floral foam I had bought did not Support it well...but the ball was a very Tight fit and worked great for the vase that I had.)
 I hot glued on some floral moss and Wah-LAH----Project is done!
You LIKE???
I LIKE!!!!
WHAT YOU NEED:

2 Styrofoam balls (1 painted/ 1 plain)
1 stick
vase/pot
Several Berry picks approx 10-12 (I suggest 2 sizes to give you some depth...but you can do as you like.)
spray paint (IF berrys are not the color you want)
Wire cutter
Glue gun
Moss


HAVE FUN!!!!